
Handmade, Luxury shaving products done right- from start to finish.
A in-depth look with step by step instructions how we make a straight razor, custom laser engrave the wood handles and assemble the full blade holders that are popular around the world today.
Every straight razor we formulate starts off a seed, which turns into a tree and eventually becomes a tool to groom a man's face- by which we have grown to fall in love with as a luxurious experience. The elegant process of shaving is complimented by our dedication to make the finest straight razors on planet earth with the finest species of wood available. We pay an extreme attention to detail throughout the process to ensure that even thousands of an inch aren't missed.
We produce thousands of razors per year and sell them all over the world in over 70 countries so far. It is our passion to deliver: customers, barbers, and straight shaving enthusiast alike with a superior handmade product. Our goal is that every customer may recognize and appreciate the great attention to detail,that we put into our products. We hope that the inside look at our production facility provides you with a better understanding of how your products made it from a seed in the ground, eventually into straight razor and finally into your hands. For hobby woodworkers and creative minds alike if you are looking to make your own straight razor as a weekend project, or simply have more questions about our entire process please don't hesitate to send us an email and ask us as many questions as you have! We would love to hear from you!
Step 1. Design and draw your straight razor

Not everyone is a conceptual creators, try drawing outline boxes first if you can't imagine the total size and work your way backwards.
The First step in making your very own straight razor is deciding which type of razor blade or holder you want. At Forever Fresh Razors we primarily produce replaceable blade straight razors called the "Butterfly" system. Our replaceable straight razors have been used around the world in over 70 countries, which provide a platform of trust that we produce the world's finest straight razors.
Selecting a blade or blade-holder will determine the size of your straight razor, which is important to the shape and size of wood you will require. Most of our razors come in a 1/2 thickness and our blanks of wood start at 6" long.
Tip: draw your razor design out on cereal box cardboard, cut it out and hold it in your hands, does the size look normal to you? Will you want to change it slightly? When we started we drew directly on wood. Here you can see the 1st and second razors we ever made. The solid block of wood is actually the first razor we ever assembled and still travels around the world with our founder Curtis in his toiletries kit.
Step 2. Select your wood

Shopping for your straight razor material
The second step in making a straight razor for shaving is selecting the species of wood for your custom engraved handle. Making an informed decision about which wood species you ultimately decide on using is equally as important when you are electing your wood. Some wood species have adverse characteristics about them which could negativley affect your luxurious shaving experience.
Wood is a complex organic material which has been known to cause some people allergic reactions. Different species of wood have very different characteristics to them and can cause your straight razor handle to warp, crack, or worse, not be strong enough for a razor handle.
When selecting your wood you can choose among a variety of commonly available woods such as: Alder wood, Maple Wood, Walnut Wood, Cedar Wood, & something exotic like Purple Heart. We make an effort to keep the staples & most commonly sought after types of wood commonly available. One thing to keep in mind is the cost of your wood. Most commonly available woods come at a somewhat reasonable price and you should budget 5-15$ per Bd. Ft. for a block of wood. More exotic woods can rack up the cost dramatically and if you are selecting something like Wenge, Bocote, or African Blackwood like we regularly use you can find your prices as high as 50$/Bd. Ft.
Tip: If you are a hobby woodworker and want to make a straight razor as a weekend project, ask around at your local lumber store for something called a "Pen blank." Chances are it will be a little small, but you will probably pay 10-20$ for an exotic wood blank rather than having to purchase a minimum amount of 10+ Bd. Ft. We regularly purchase lumber in large quantities and store it for when we have to make razors, however, for most people looking to make 1 this isn't a viable option.
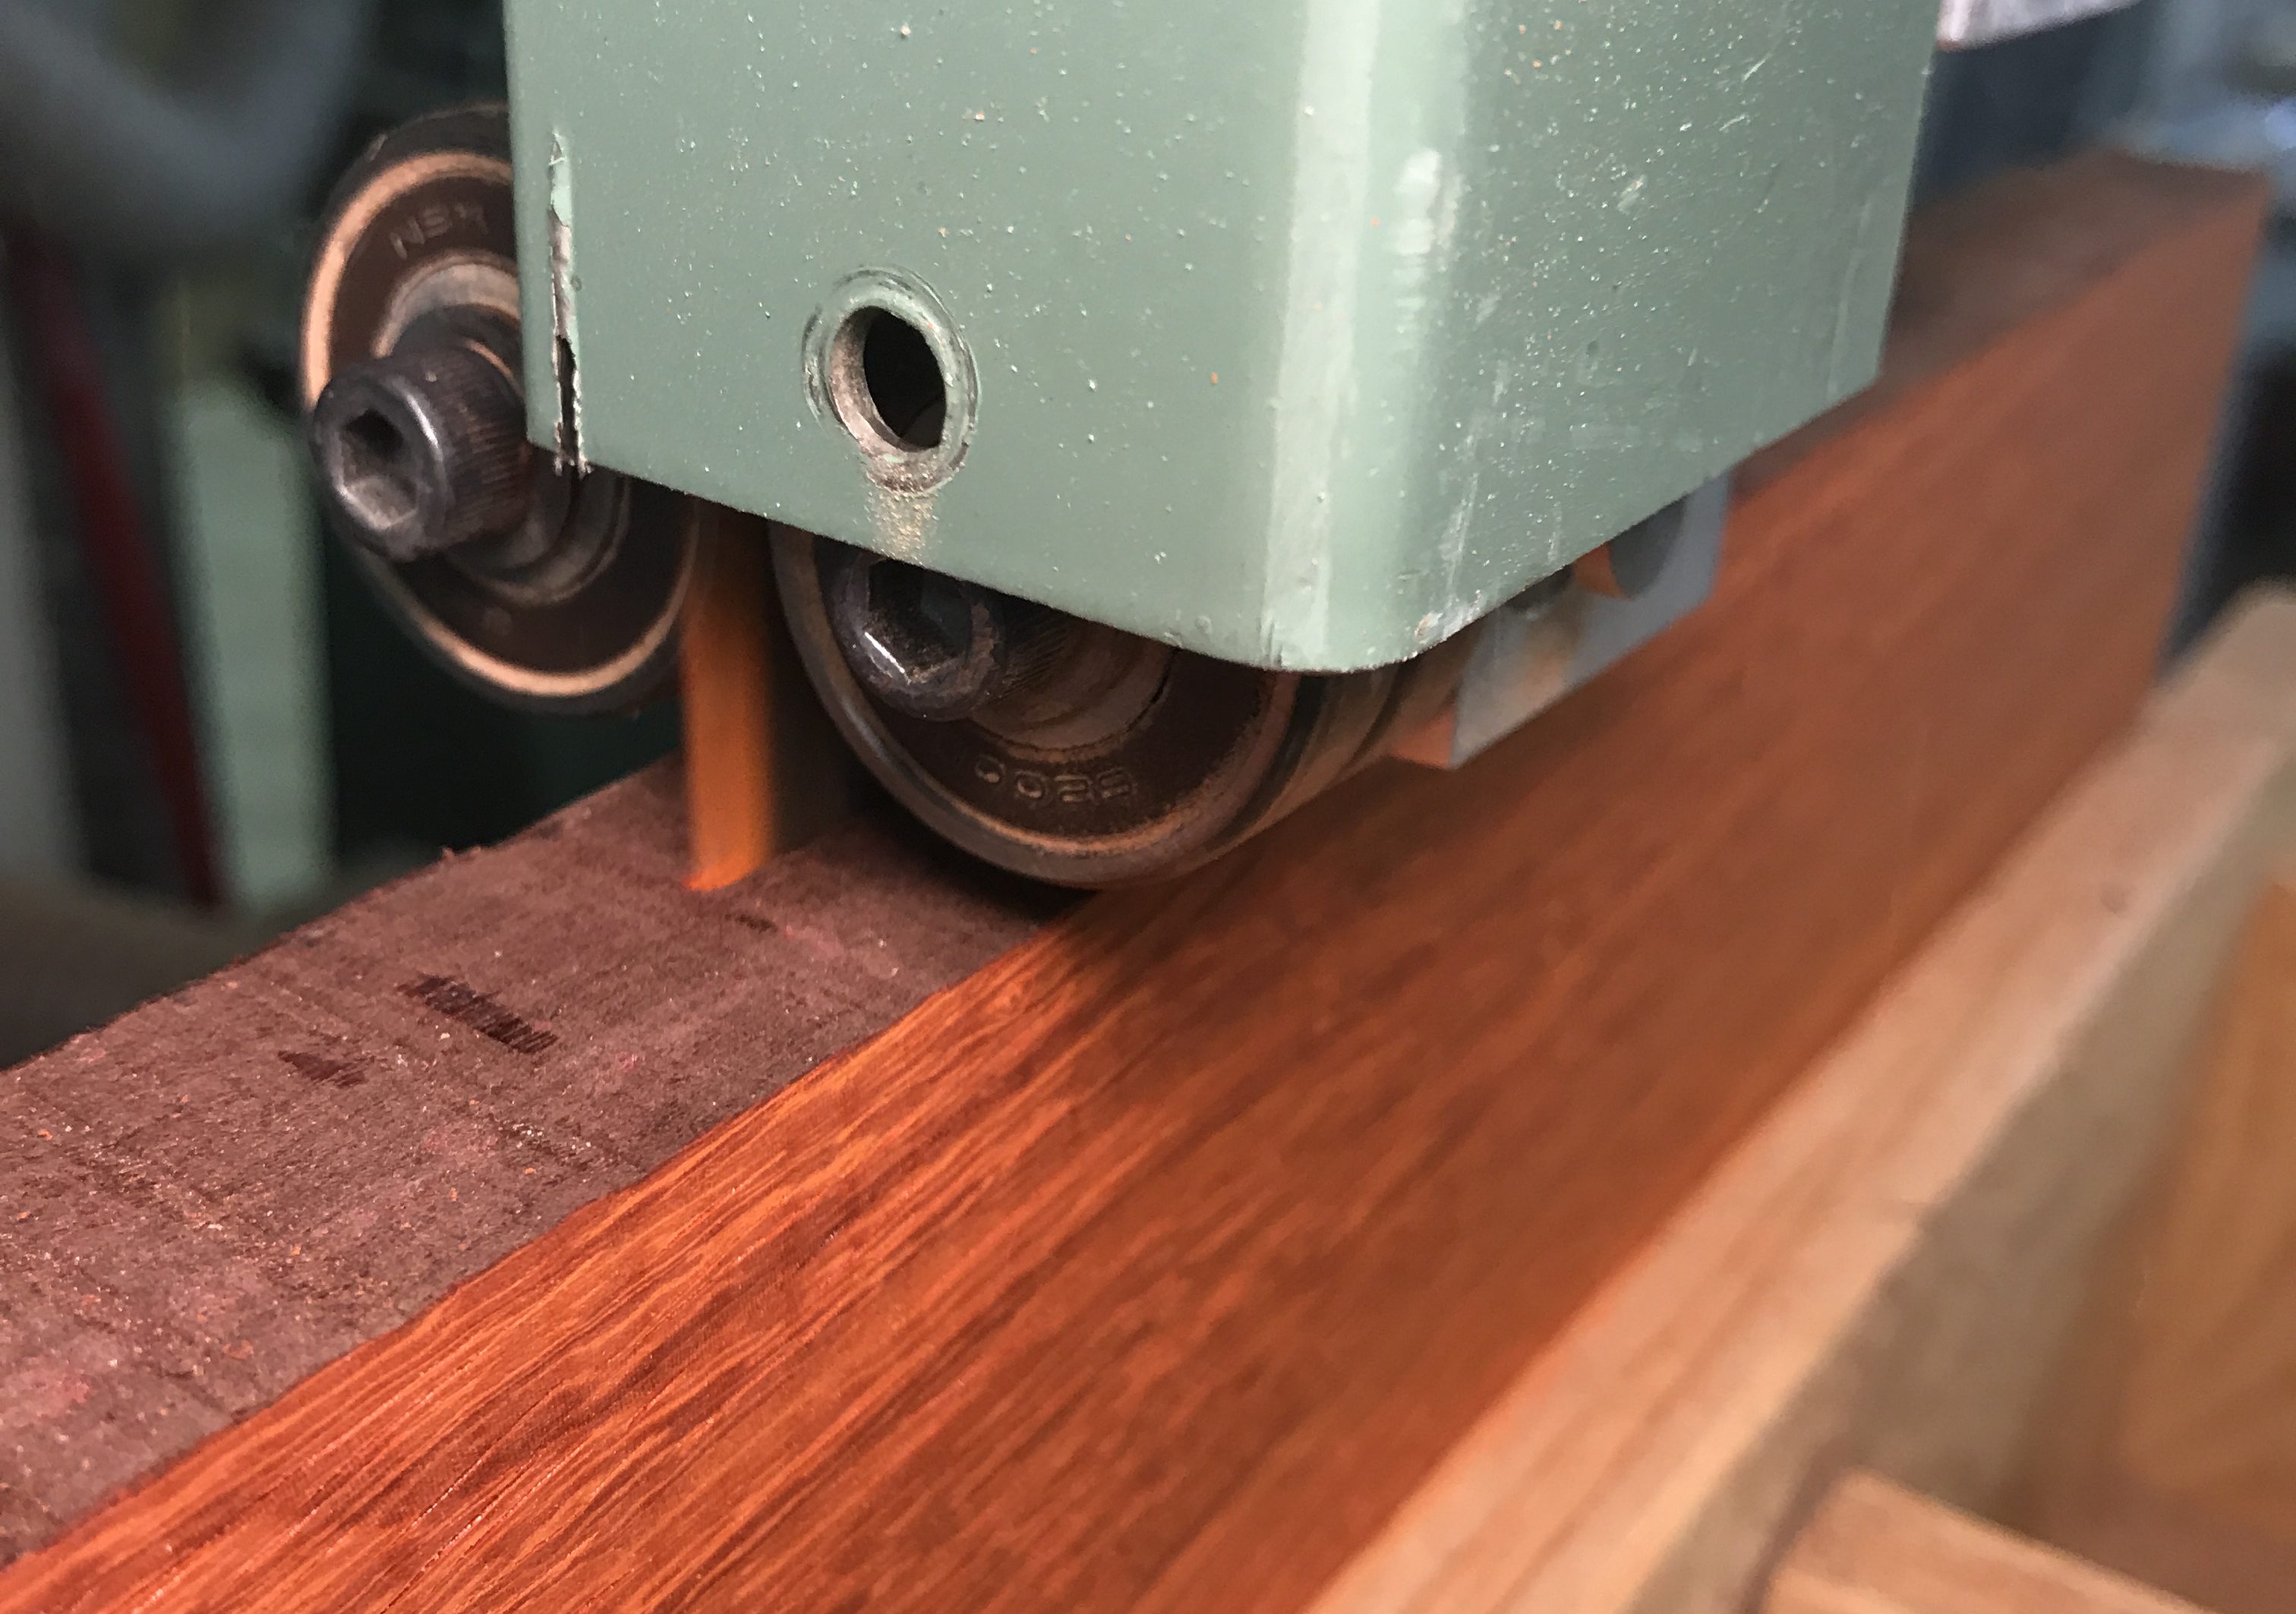
Step 3. Mill and shape your lumber


Milling your newly found straight razor materials is a labour of love.
After selecting your desired wood for the razor handle, you will need to mill and joint your lumber into a manageable size with paralell dimensions, with a uniform thickness. This step is important so that your razor has equal sides, and remains even when you get to Step 6 your razor will not warp or have uneven sides. The process of shaping and milling your lumber can be done with a variety of methods and machines. For us we use an industrial band saw, thickness planers, jointers, sanders and a table saw.
Our razors are traditionally milled to .500 inches thick. It is extremely important for the next steps of our process that we mill, sand and shape our lumber to within 5/1000th of an inch. We take pride in our straight razors and ensure that every straight razor carries our consistent shape and thickness.
Tip: Get yourself a micrometer and don't settle for anything less than perfect. A shave is meant to be perfect, so why should your craftsmanship ever be anything less.
Step 4. Cut out a rough shape

In woodworking there is never perfect, just better.
When you cut out your rough shaped razor ensure that you have left some room for sanding and final adjustments to your overall size. We recommend leaving 1/16 1/32 of an inch. You can achieve this shape with a variety of tools. Hand carving, band saw cutting, or using a scroll saw are all methods that we have utilized to produce our straight razors. When we made our first straight razor it was entirely made with a band saw. The rough prototype model made on a band saw soon become perfected on a scroll saw and finally carved by hand. Once we perfected our shape, felt the razor's weight, and general presentation of the razor we moved to a more rapid production model. Hand carving razors only worked for about 60 days. Choosing a shape or working from a template which is easily replicated is very important. For a 1-off razor simply create a shape you feel is comfortable to you. Our razors have a unique shape which is very uncommon among other brands, but we feel it holds the weight of the handle perfectly balanced while you shave.
Step 5. Rough sand and drill pivot holes


Theres nothing worse than getting to this step and wasting all your hard work.
The next step is drilling holes in your brand new straight razor. The importance of using a high quality industrial drill press could not be stressed any more. It is of the upmost importance that you use a drill press and do not attempt the drilling with a hand drill. The reason this pivot hole needs to be drilled so carefully is even 2 degrees off of centre and your razor will not swing perfectly entered back into the slot in which you create during the next step. If this happens your carefully constructed straight razor wood handle could be a complete waste of your time and will not function like it is supposed to. Having the bade stored between two wood handles actually helps deliver a negatively offset humidity level close to the blade and will actually help dry the blade out of any surface humidity.
Step 6. Remove wood for razor slot

One of the most carefully executed steps cutting a slot for your blade to swing into is probably the second most important step of crafting your razor. If you do not cut this slot absolutely straight you will be left with un-even razor scales (sides). If you do not cut your razor slot perfectly straight your razor can also swing off centre and will not deliver a superior shave. The width of your razor slot will be determined by the type of blade or blade holder you choose. Some damascus steel and regular stainless steel blades require a thiner slot, whereas our blade holders require a minimum of .125 inches.
Step 7. Router perimeter edges for round-over feel

Making sure your straight razor feels natural in your hands and allows you the dexterity to switch between different shaving strokes is largely in part determined by the edge you implement on your razor. Too little of a round over and the edges of your shaving razor will cut and pinch the nerves in your fingers while you hold it. a small round-over can feel comfortable, however, when switching between various shave strokes it may not roll over in your hands the way it is meant to. Choose a edge radius that feels comfortable to your style as this decision is largely personal preference.
Tip: start with 220 grit sand paper while hand-making your edges. In a 1-off weekend straight razor you will find that wood on edges disappears very fast when sanded, so go slow!
Step 8. Prepare graphics for custom engraving

Before you give your razor a final sand and finish it with mineral oils or wax you need to design some graphics for your razor. The industry standard for graphic design is a program called Adobe Illustrator and can be purchased through the Adobe software program for as little as 30$ per Month. This step is important to do before your final sand because there will be a crucial step after engraving that requires you to use chemicals to clean off the residue caused by laser engraving.
You will need to scan a photo of your newly made straight razor handle into your computer either by taking a photo of it or with an actual scanner. Our graphics fill our wood handles to within .0315 of an inch of empty space around the edge of each razor. If you are looking to elevate your straight razor to looking like its been professionally engraved by us then this step is very crucial as well..
Step 9. Laser engrave razor with our Trotec Speedy 400 Laser machine

There is an entire week up to multiple months full of training required to train someone how to use a laser machine probably. They are extremely expensive machines, and if you are purchasing one like the machine we use, expect to pay upwards of 50,000$ + training and an investment of time to perfect your skills. We always do a test batch of engraving on our templates and layout materials, however if you are doing just one, you can expect to engrave a few test images onto wood or even tape to ensure your layout is perfectly aligned.
Step 10. Clean excess residue off of razor handle from vaporizing wood

Precision engraving is only half the battle, cleaning your handle will be an art in itself.
Once your razor has been engraved you can expect it to be covered in a large amount of residue, vaporized organic matter, and smell poorly like smoke. Cleaning your handle is important so that these residues and left-over material are removed and don't contaminate your freshly shaved skin at a later date. We clean our razor handles with rubbing alcohol, and or methyl hydrate. Both of these chemical solutions evaporate very fast after cleaning the surfaces and provide a zero-smell salutation once the job is done.
It is important that while cleaning residue off your straight razor handle you do not rub the residue into the wood. You must pay extra attention to texture between fonts and letters, it is extremely easy to rub the residue right back into the wood and thus stain the handle with vaporized organic matter.
Final sand: Once your razors are cleaned the final step before assembly is a final touch up with sand paper anywhere from 400-1,000grit. This should be done in multiple steps with 100-200 grit intervals and very carefully so that your engraving is not compromised.
Step 11. Seal razor with oils and wax

This step will entirely be up to you how you want to finish your straight razor's wood handle. You can cover it in resin, stain, a wax finish, or even paint. We finish our straight razors in a luxurious orange smelling wax after they have been cleansed and coated in mineral oils. Coating your straight razor shaving handle in a mineral oil or wax will render their "pores" clogged and reduce the amount of contamination at a future date when you regularly use your razor for shaving. Keeping your razor regularly coated with a wax or mineral oil is vital in keeping your razor handle's life prolonged.
Step 12. Construct and assemble Stainless steel razor head
(we will cover this aspect of our construction process in the future. It has MANY steps and involves a much higher level of engineering, explanation and descriptive process.
Step 13. Assemble razor mechanism with BRASS rivets

Aligning the razor between your wood handle is a tricky step which requires very steady hands. It is recommended that you install the "Female" side of the rivet on the bottom, and hammer the "Male" side down into it compressing, aligning and joining both layers of wood together. Our razors are a 1 rivet design and provide an excellent solution to multi part razors with a 1-piece wood handle design.
The final step before your razor is shave ready is compressing the brass rivet which connects your blade holder to your wood handle. These rivets are brass and extremely soft metal. It is important that you treat these rivets with care, and don't try to rush anything. Many times you can render an entire razor useless by compressing a rivet together and forgetting how fragile and delicate that really can be.
Tip: The smaller the hammer the better. 100 small taps are better than 10 full hammer swings that could do a lot more damage than good.
Step 14. Insert a Dorco Prime Platinum full blade

Nothing feels as goof as a fresh shave and hot towel, except a Forever Fresh Shave...
There is nothing worse than having to break a blade in half every single time you want to shave, or worse multiple times throughout the day as a barber when you are simply shaving a clients hairline, neck or entire hot shave. Our full blade holder allows customers to utilize a full blade without having to dangerously break the blades.
Some hair strands are extremely coarse, and having the luxury to be able to pause, change a blade and resume shaving, is extremely handy. If you are wanting to give your clients the absolutely closest, sharpest shave them our full blade holder is the perfect fit. Dorco Prime platinum blades are our favourite blades and we find they hold an edge the longest while remaining supremely sharp at the beginning of your shave!